
Step by step brow mapping diagram – The art of brow mapping has become an essential technique for achieving perfectly shaped brows. This comprehensive guide will provide a step-by-step brow mapping diagram to help you create a customized brow shape that complements your facial features.
In this guide, we will delve into the nuances of brow mapping, exploring the tools and techniques required to measure, shape, and fill in your brows for a natural and flattering look.
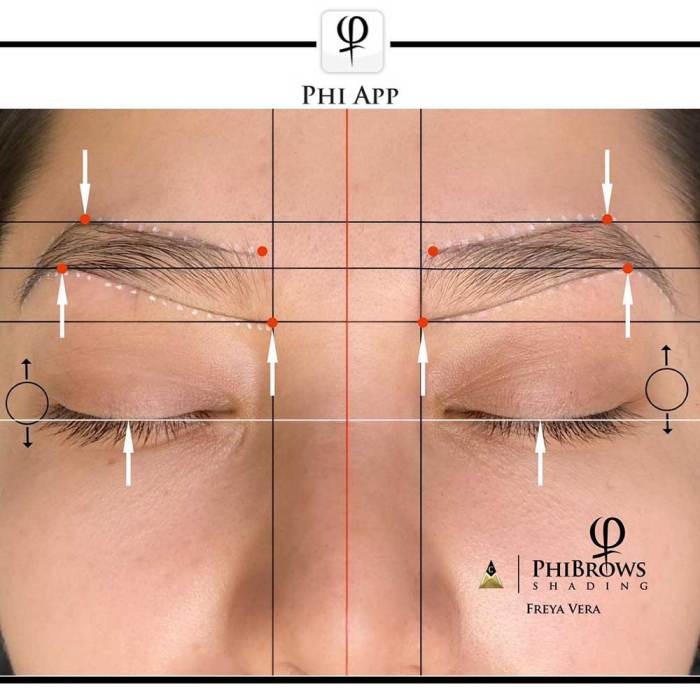
Step-by-Step Brow Mapping

Brow mapping is the process of determining the ideal shape and size of your eyebrows based on your facial features. It helps to create a balanced and flattering look that complements your face shape.
Step 1: Determine Your Natural Brow Shape
Using a light-colored eyebrow pencil or marker, gently trace the Artikel of your natural brow shape. This will help you identify the areas that need to be filled in or shaped.
Step 2: Mark the Three Main Points
Use an eyebrow ruler or measuring tape to mark the three main points of your brows: the inner corner, the arch, and the outer corner. The inner corner should be aligned with the inner corner of your eye, the arch should be at the highest point of your brow, and the outer corner should be aligned with the outer corner of your eye.
Step 3: Connect the Dots
Using a light-colored eyebrow pencil or marker, connect the three main points to create the Artikel of your desired brow shape. This will help you visualize the final shape and make any necessary adjustments.
Step 4: Fill in the Gaps
Use an eyebrow pencil or powder to fill in any gaps or sparse areas within your desired brow shape. Be sure to use a light hand and blend well to create a natural look.
Brow Shape Selection
The shape of your brows can have a significant impact on the overall appearance of your face. When choosing a brow shape, it’s important to consider your face shape and personal preferences.
Face Shape and Brow Shape
- Oval Face:Oval faces are well-balanced and can accommodate a variety of brow shapes. However, soft, rounded brows with a slight arch tend to be the most flattering.
- Round Face:Round faces benefit from brows with a higher arch and a more angular shape. This helps to create the illusion of a longer face.
- Square Face:Square faces look best with brows that are straight across with a slight arch. This helps to soften the angles of the face.
- Heart-Shaped Face:Heart-shaped faces have a wider forehead and a narrow chin. Brows with a soft, rounded arch can help to balance the face.
- Diamond-Shaped Face:Diamond-shaped faces have a narrow forehead and a wider chin. Brows with a high arch and a slight angle can help to create a more balanced look.
Brow Measurement and Symmetry
To achieve symmetrical brows, it’s important to measure and mark the length, width, and arch of your brows.
Measuring the Length
Using an eyebrow ruler or measuring tape, measure the distance from the inner corner of your eye to the outer corner of your eye. This will give you the desired length of your brows.
Measuring the Width
Using an eyebrow ruler or measuring tape, measure the distance from the top of your brow to the bottom of your brow. This will give you the desired width of your brows.
Measuring the Arch
Using an eyebrow ruler or measuring tape, measure the distance from the highest point of your brow to the bottom of your brow. This will give you the desired height of your brow arch.
Brow Hair Removal Techniques
There are a variety of brow hair removal techniques available, each with its own pros and cons.
Tweezing
- Pros:Tweezing is a precise method that allows you to remove individual hairs. It’s also relatively inexpensive and can be done at home.
- Cons:Tweezing can be time-consuming and painful, especially for sensitive skin.
Waxing
- Pros:Waxing removes multiple hairs at once, making it a quick and efficient method. It also lasts longer than tweezing.
- Cons:Waxing can be painful, especially for sensitive skin. It can also cause redness and irritation.
Threading
- Pros:Threading is a precise method that removes multiple hairs at once. It’s also relatively inexpensive and can be done at home.
- Cons:Threading can be painful, especially for sensitive skin. It can also cause redness and irritation.
Brow Filling and Enhancement
If you have sparse or uneven brows, you can use makeup to fill them in and enhance their shape.
Brow Pencils
- Pros:Brow pencils are easy to use and can create a natural-looking finish. They’re also available in a wide range of colors to match your natural brow color.
- Cons:Brow pencils can smudge or fade throughout the day, especially if you have oily skin.
Brow Powders
- Pros:Brow powders are more difficult to apply than brow pencils, but they can create a more natural-looking finish. They’re also less likely to smudge or fade.
- Cons:Brow powders can be difficult to apply evenly, especially if you don’t have a steady hand.
Brow Gels
- Pros:Brow gels are easy to use and can help to set your brows in place. They’re also available in a variety of colors to match your natural brow color.
- Cons:Brow gels can make your brows look stiff or unnatural if you apply too much.
Eyebrow Grooming and Maintenance
Regular eyebrow grooming is essential for maintaining a neat and polished appearance.
Trimming
Trimming your brows helps to keep them neat and tidy. Use a small pair of scissors to trim any stray hairs that extend beyond the desired shape of your brows.
Brushing
Brushing your brows helps to remove any dirt or debris and keeps them looking smooth and shiny. Use a clean eyebrow brush to brush your brows in the direction of hair growth.
Conditioning
Conditioning your brows helps to keep them healthy and prevent them from becoming dry or brittle. Apply a small amount of eyebrow conditioner to your brows and leave it on for the recommended amount of time.
FAQ Guide: Step By Step Brow Mapping Diagram
What are the benefits of brow mapping?
Brow mapping helps determine the ideal brow shape for your face, ensuring symmetry and balance. It allows for precise shaping and filling, minimizing the risk of over-plucking or uneven brows.
What tools are needed for brow mapping?
Essential tools include a brow pencil, ruler or measuring tape, tweezers, and a spoolie brush. Optional tools may include a brow stencil and a magnifying mirror for precision.
How often should I map my brows?
Brow mapping is typically done every 4-6 weeks, as your brows grow and change shape. Regular mapping ensures your brows maintain their desired shape and symmetry.
